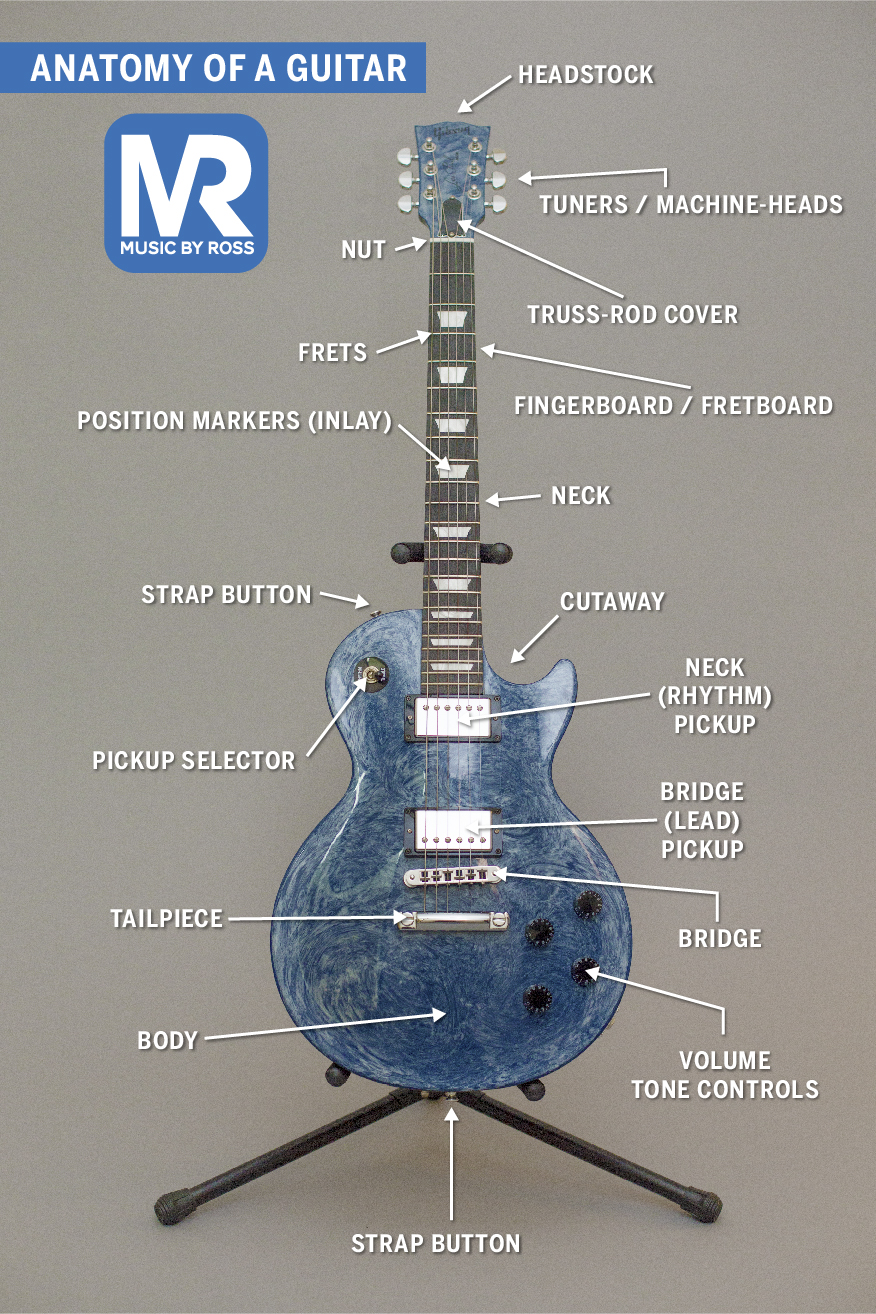
The Anatomy of the Guitar
In your first few guitar lessons, you may encounter specific terms that are unfamiliar to you. Whether you’re learning on an acoustic, classical or electric guitar, and regardless if you’re training is coming from a book, video, online lessons or from one of our private guitar teachers, it is very important to become acquainted with the parts of your guitar.
Below is the basic anatomy of the modern guitar. Memorizing the names of a few key parts of your guitar could make all the difference when you learn to play guitar.
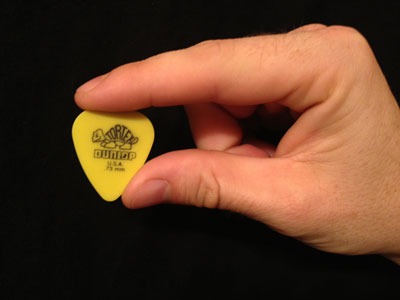
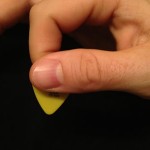
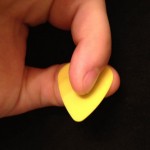
The Proper Way to Hold a Guitar Pick
One question all guitar instructors hear from beginners is, “How do I hold the pick?” Holding the pick properly is arguably the most vital technique of playing the guitar, especially in the intermediate and advanced stages of learning. With a little practice, holding the pick correctly can become second nature, and give you a huge edge in your guitar playing progress.
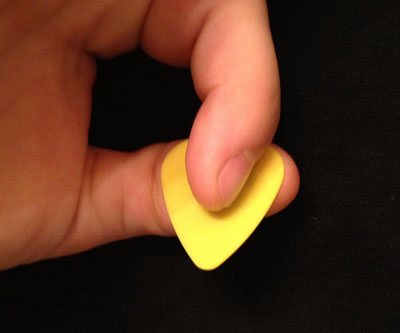
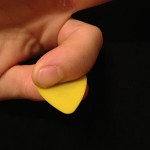
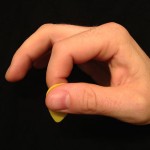
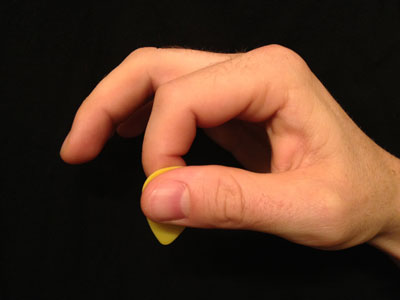
Steps to Properly Holding Your Guitar Pick
-
- Step one (a).

-
- Step one (c).
-
- Step one (b).

-
- Steps two & three.
- Grip the pick with the point downward between your index finger and thumb.
- make sure that your thumb is positioned horizontally across the top (larger half) of the pick.
- grip the opposite side of the pick with your index finger making sure that your index finger is pointed the opposite direction of your thumb
- now turn the index finger slightly downward.
- Be sure you are gripping the pick to where you have a “hole” in the space between your pointer and thumb. Having a “line” in this space is incorrect. A helpful is “try not to grip your pick like a hammer”.
- Your remaining fingers (middle, ring, pinky) should be relaxed. Again, avoiding gripping the pick like a “hammer” is an important habit to have, as you will need the remaining fingers loose when you start obtaining intermediate and advanced techniques.
- Lastly, be sure that you hold your pick lightly. Gripping the pick too tightly will result in “blasting” the strings, and will make strumming more difficult. Grip your guitar pick with “medium” force — to where it doesn’t fall out of your fingers — but light enough to where someone could remove the pick from your fingers fairly easily.
Tuning the Guitar
Although there are many ways of tuning your guitar, most of the time your guitar will be tuned to “Standard Tuning”. This tuning encompasses vast majority of modern and classical guitar music.
Your guitar has a total of 6 strings. Counting from the bottom string to the top string, the bottom string is conventionally called “String 1” and the top string is called “String 6”. Starting with the 6th string (top), tune your guitar as follows: E A D G B E. Commonly, guitar instructors will teach you a catchy phrase to help you remember the correct pitch for each string on the guitar. For example, “Elephants And Donkeys Grow Big Ears”.
Before you begin tuning, you will need a tuner. Most tuners range in price from $12 to $50 at your local music store, and tune strings based upon: string vibration, pitch recognition with a microphone, or a 1/4″ guitar cable input jack. The differences between tuners can be easily explained by the salesperson, or your guitar instructor. (Directions for use are provided by the tuner manufacturer) In the beginning, operating your tuner will take a bit of practice, but in a short amount of time, this task will become simple and will take only a few seconds.
Gaining Strength In Your Fret Hand
When you first learn to play guitar one of the more frustrating aspects is pushing the strings down with enough force for notes to sound out properly. Whether you are trying to accomplish basic chord shapes, tackling famous guitar licks, or familiarizing yourself with a scale, holding a note can be challenging to beginner guitar players. With a few helpful tips, these frustrations can be easily overcome.
- Be sure that your thumb is on the back of the guitar neck, and you are creating a “clamp” with your finger tips and your thumb. Building strength, especially in your thumb, is essential in guitar technique.
- Use your finger tips to push the strings down vs. the softer part (finger print area).
- 5-Second Hold Exercise
- Take each finger, one at a time, and practice holding a single note for 5 seconds. Start this exercise on the top string and repeat with each subsequent string.
- Practicing this exercise on the 1st or 2nd fret will produce the quickest results, as the strings have higher tension towards the beginning of the fret board.
You can also apply the “5-Second Hold Exercise” to holding basic chord shapes, and discover similar results.
Building Calluses
One of the challenges that all guitar players must overcome is building calluses on their fretting hand. For beginners, the realization of how hard one actually has to push to get a note to sound out, usually comes as a bit of a shock. You may find that pushing down your guitar strings appropriately is slightly uncomfortable. The good news is, your calluses start building on day one, and usually within a 2-3 weeks, you will have little or no finger pain at all.
The two factors that contribute to obtaining and keeping calluses are Pressure and Friction. Here are a couple of easy tips using these two factors that will help you build your calluses.
- Pressure – The most effective technique you can use to build calluses on your finger tips, is the obvious one — play every day until it hurts! Believe it or not, simply practicing your guitar is the quickest way to build calluses. Applying the correct amount of pressure to make a note sound out on your guitar is all you need to get your fingers in shape. Again, within 2-3 weeks, your calluses will have formed enough to eliminate most of your discomfort.
- Friction – Another technique that some guitar players use to build and maintain their calluses, is running their fingers up and down the top string. If you will notice, the top string (String 6) of your guitar has the deepest ridges between the coils. Below are the steps to a simple calluses-building exercise using your top string.
- Starting with your index finger, push down the first fret — Your finger should be on on your top string (String 6).
- Slide your finger at a medium speed up to the final fret keeping your finger on the top string for the entire slide.
- Once you have reached your highest fret on the top string, slide your finger back down to the 1st fret at a similar speed.
- Continue to slide your finger tip up and down the top string until you experience a small burning sensation in your finger tip.
- Repeat this exercise with all of your fingers (index, middle, ring, pinky).
This is a simple exercise that will bring quick results in building your guitar calluses!
I hope this helps you get started!
~ Kellen Ross (Music By Ross Instructor – Guitar)